<?xml version="1.0" encoding="utf-8"?><feed xmlns="http://www.w3.org/2005/Atom" ><generator uri="https://jekyllrb.com/" version="3.10.0">Jekyll</generator><link href="https://wm-eddie.info/feed.xml" rel="self" type="application/atom+xml" /><link href="https://wm-eddie.info/" rel="alternate" type="text/html" /><updated>2026-08-08T15:40:05+00:00</updated><id>https://wm-eddie.info/feed.xml</id><title type="html">Thinking Sands</title><subtitle>Making sand think, one grain at a time</subtitle><author><name>wmeddie</name></author><entry><title type="html">Joining the Weird Keyboard Club</title><link href="https://wm-eddie.info/2025/01/26/joining-the-weird-keyboard-club/" rel="alternate" type="text/html" title="Joining the Weird Keyboard Club" /><published>2025-01-26T11:19:07+00:00</published><updated>2025-01-26T11:19:07+00:00</updated><id>https://wm-eddie.info/2025/01/26/joining-the-weird-keyboard-club</id><content type="html" xml:base="https://wm-eddie.info/2025/01/26/joining-the-weird-keyboard-club/"><![CDATA[<p>Recently, I ventured into the world of custom keyboards. Which seems to be actually a trend for engineers here in Japan. I’ve been here for a while but never really realized how many split keyboard designs actually originate from Japanese engineers. I think the Keyball keyboards are really something special, even though they are not as popular as the Corne keyboard. Since there’s not a lot of English information about the Keyball, I decided to write about it on my blog.</p>

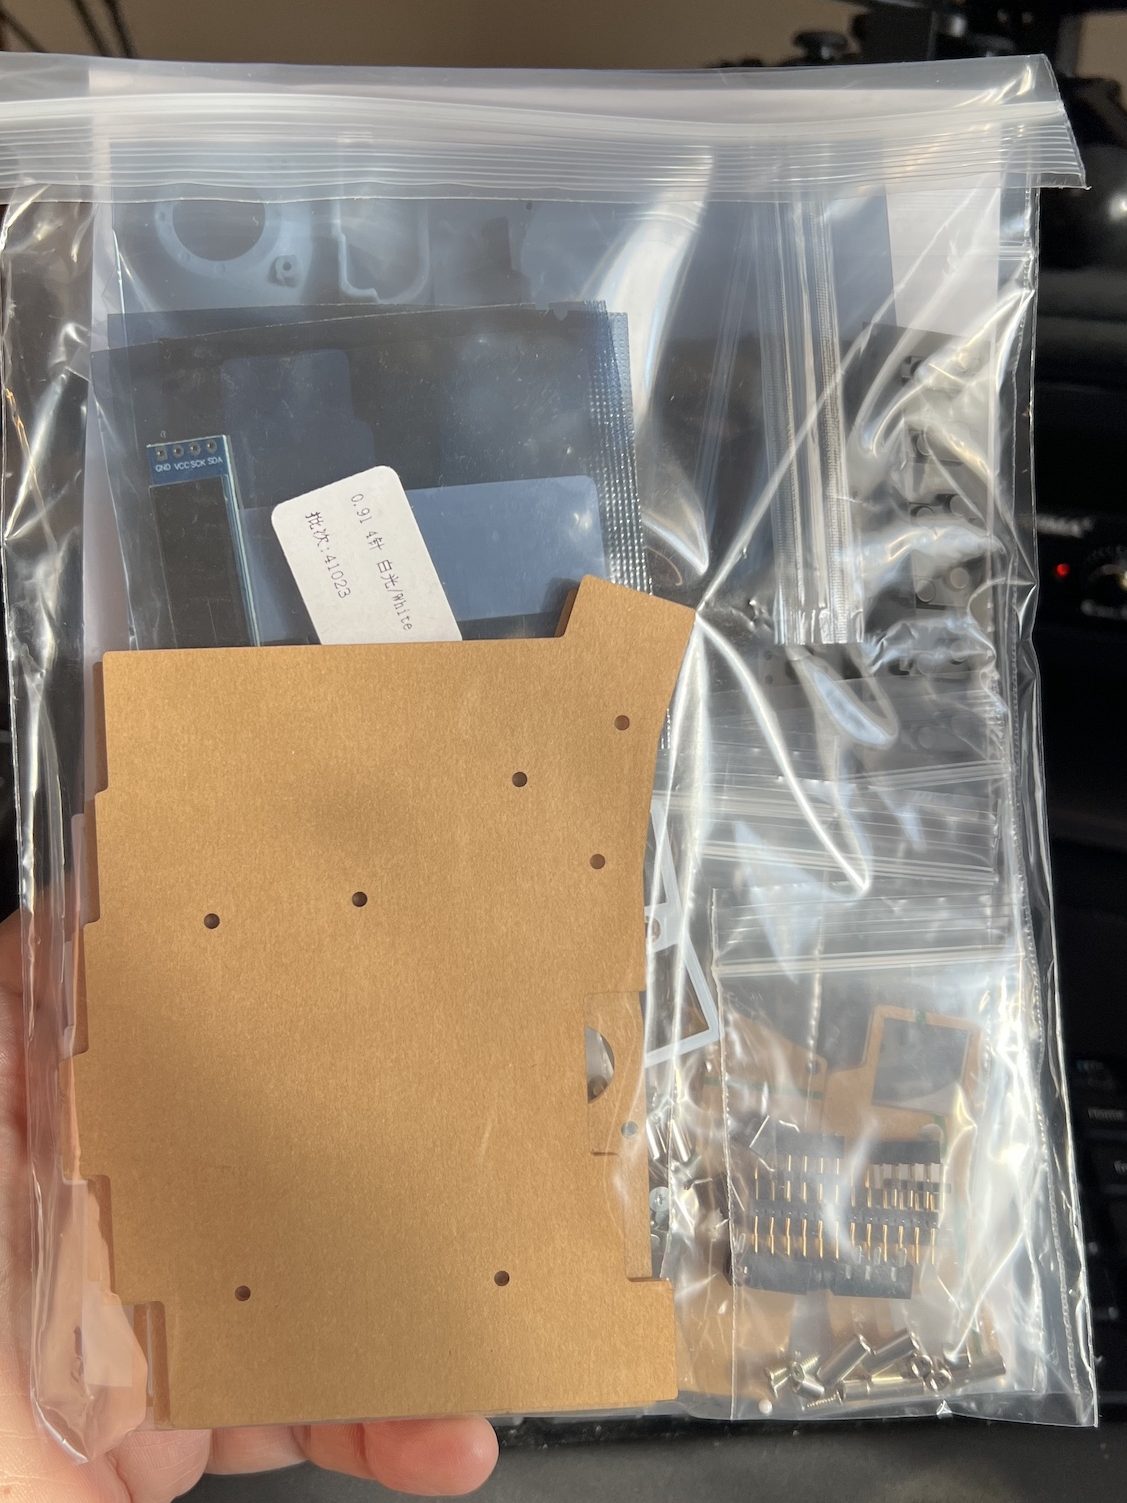
<p>I’ve known about, and have been intrigued by, the <a href="https://shirogane-lab.net/items/64b8f8693ee3fd0045280190">Keyball</a> keyboard, a split keyboard with an integrated trackball for some time but since my main daily driver has been the Microsoft Sculpt keyboard, I haven’t really thought about switching. Unfortunately my Sculpt keyboard was starting to show its age. The rubberized grips of the ergonomic mouse it came with are deteriorating, and pretty unpleasant feeling, and the wrist pad on the keyboard is falling apart. When I discovered that Microsoft had discontinued the Sculpt keyboard last year, I stumbled upon a glowing (and quite funny) <a href="https://youtu.be/zcd_l9BTo0s?si=2p6dpG63BpyYHFGx">review of the Keyball 39</a> boldly claiming that “Ultimate Keyboard Quest Ends” with the keyboard . In my state of despair, I impulsively decided to buy it. A few minutes after hitting the buy button, I learned that, I had purchased a kit, not an assembled unit. I knew it is normally a kit, really not sure why I didn’t read closer. But since by then it was already on the way, I decided to just buy some solder switches and key caps, and plunge headfirst into the deep end of the custom keyboard pool.</p>

<p><img src="/wp-content/uploads/2025/01/IMG_2186-edited.jpeg" alt="" /></p>

<h2 id="the-youtube-algorithm-and-mechanical-keyboards">The YouTube Algorithm and Mechanical Keyboards</h2>

<p>I wasn’t completely in the dark. A while back, the YouTube algorithm decided I was into keyboards out of the blue, and I found myself watching hundreds of mechanical keyboard reviews. While I was perfectly happy with what I felt was practically the perfect keyboard, I was impressed with how high the production value, camera work and practically Apple-like visuals many of (<a href="https://www.youtube.com/@3ildcat">:3ildcat for example</a>). The keyboards themselves never appealed to me. As I’ve been using Microsoft ergonomic keyboards since the 90s when they were known as the Natural Keyboard. The lack of any real ergonomic mechanical keyboards meant I never found anything that looked appealing, so I eventually stopped watching.</p>

<h2 id="assembling-the-keyball-39">Assembling the Keyball 39</h2>

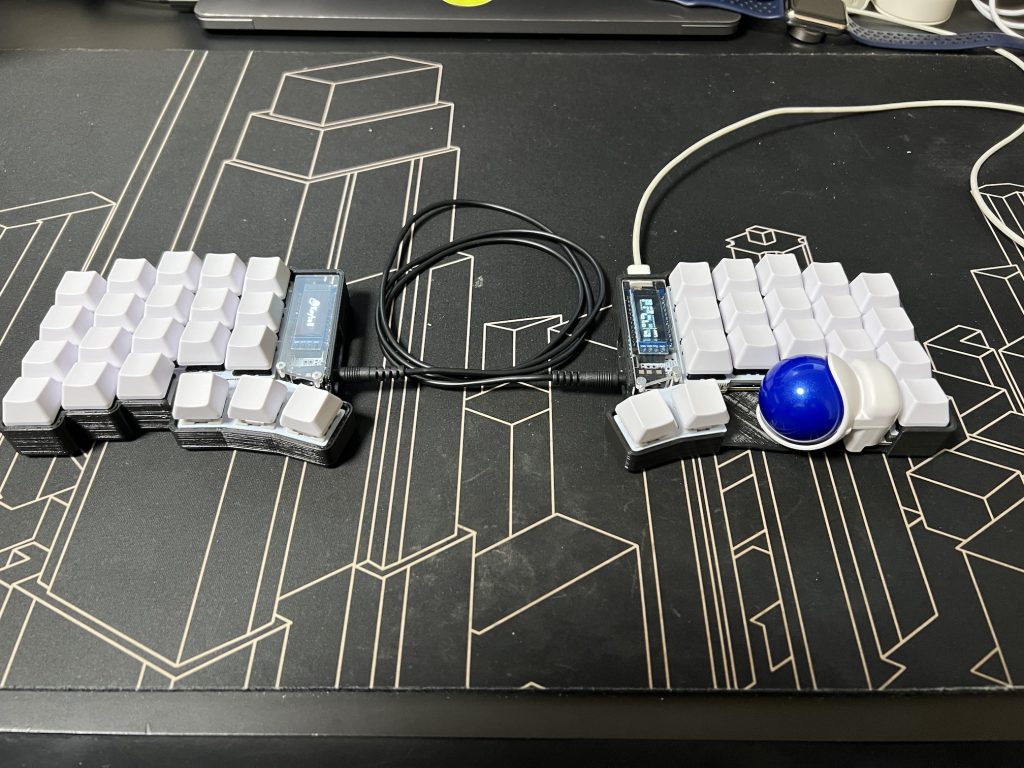
<p>Assembling the Keyball 39 was easily the most challenging electronics project I’ve undertaken since high school (where I built some circuits by hand for physics class). It’s definitely not something I recommend for beginners, but there are custom keyboard shops in Japan where you can get assistance. Despite the difficulty, I managed to put it together one Saturday evening. Assembling these kinds of things yourself really does give you the confidence that you could fix any issues and even do modifications in the future. This aspect is particularly valuable now that Microsoft has abandoned the Sculpt keyboard.</p>

<p>If you are going to try putting one together yourself I recommend the official <a href="https://github.com/Yowkees/keyball/blob/main/keyball39/doc/rev1/buildguide_en.md">Keyball39 build guide</a> and this <a href="https://youtu.be/XyoEP3h4iB8?si=d2TmMvspbahKfDu2">build video of the keyball44</a>. Definitely read the whole thing first as mistakes are not easily undone when soldering, especially when more than one pin is involved.</p>

<p><img src="/wp-content/uploads/2025/01/IMG_2188-1024x768.jpeg" alt="" /></p>

<h2 id="using-the-keyball-39">Using the Keyball 39</h2>

<p>Using the Keyball39 has been an adventure. If I had bought a pre-built keyboard, I might have actually returned it. But since I invested all that time and effort into assembling it, I felt committed. The main issue, is really just the limited number of keys. Even though the 39 is the most popular one, it’s because ergo maniacs are the ones who buy multiple keyboards as they constantly search for something better I think. Personally as a “Caps-Lock as Control” user myself since I picked up Emacs in high-school, It is just infinitely better to have a column of keys next to your pinky fingers for tab, control, shift on the left and backspace, enter and shift on the right.</p>

<h2 id="home-row-mods-and-my-keymap">Home-Row Mods and my Keymap</h2>

<p>The only way the 39 makes sense is by using home row mods, but even then, it’s not perfect. I actually don’t use all of my mods on the home row because A, S, D and F are quite common characters in English, and there’s a slight delay when you configured them as home row mods. I’ve found using Z as shift to be much better for me since it’s a rare character. Even so I still mistype z all the time. It is quite annoying.</p>

<p>As an Emacs user, Ctrl is a key I’ve been quite accustomed to using, and not having it easily accessible next has been one of the hardest things to get used to. Especially when I’m using a terminal. I tried for a while to use the A key as a Ctrl, but again, it causes me to trip up when I am typing way too much. I think if I were a VI user, I might have an easier time. So again, definitely go with the 44 if you are in the Emacs side of the fence.</p>

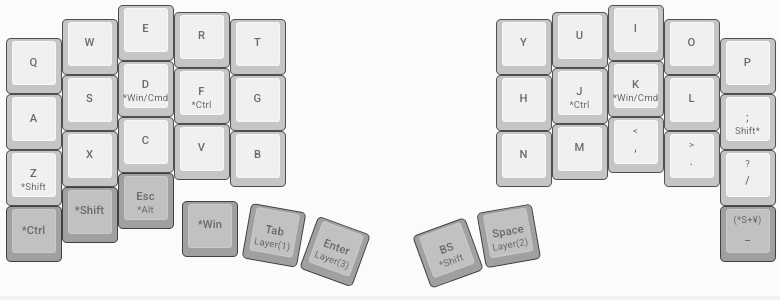
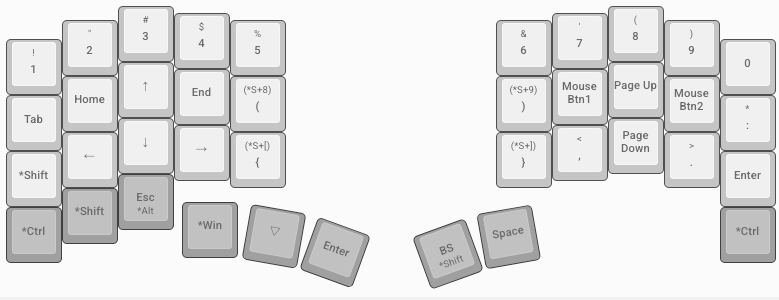
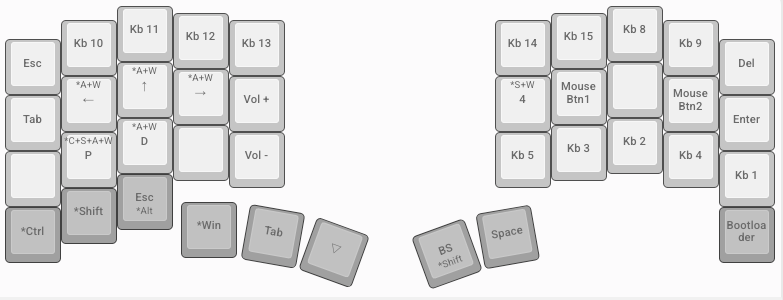
<p>I spent a whole week trying various keymaps before I settled on the one I’m using. The idea behind it is to make the keys be as close to where they are in a normal Japanese keyboard layout as possible. That way I work with my muscle memory instead of against it. You can see my keymap below if you would like some inspiration. Being able to easily tweak this in <a href="https://remap-keys.app/">Remap</a> is amazing. Couldn’t imagine how annoying it would’ve been without this UI.</p>

<p><img src="/wp-content/uploads/2025/01/Layer1.png" alt="" /><br />
<img src="/wp-content/uploads/2025/01/Layer2.png" alt="" /><br />
<img src="/wp-content/uploads/2025/01/Layer3.png" alt="" /><br />
<img src="/wp-content/uploads/2025/01/Layer4.png" alt="" /></p>

<p>I still have a few keys available in layer 4. Haven’t thought of a use for them yet, but it’ll probably be filled with macOS shortcuts that I often use.</p>

<h2 id="ergonomics">Ergonomics</h2>

<p>In general, split keyboards are more ergonomic than normal rectangular keyboards. I’ve never suffered from RSI-related pains because I take ergonomics seriously I think. Now as a person who keeps this stuff in mind, and after using this ortho-linear keyboard for a few weeks, I think I’ve learned a couple of things. First, the traditional layout of a keyboard is often criticized because you have to hold your hands at an angle, but I think this is wrong. If I look at how I use a normal keyboard. My hands are actually pretty straight. If you have your hands follow the staggered angle of the keys, it’s not that bad ergonomically. this is one of the reasons why the Natural keyboard kept that layout I think. The problem is that having your hands straight means that there’s a few keys that become hard to reach, and that’s why it has huge keys near the center, to make that easier.</p>

<p>Staggered Ortho-linear keyboards have their keys straight, so they <strong>only</strong> make sense if they are split so that you can tilt them in to the right position for your hands. The problem I find is that now my right pinky is blocked by my index finger. So I still think that a traditional keyboard layout (used in the strange way I use it) is better ergonomically. If you are using a keyboard the ‘right’ way, it’s definitely a minus. I definitely felt that my left arm got way more tired with the keyball than with my Sculpt keyboard. Even after adding a tenting mod to get it more inline with the inclination my Sculpt keyboard has.</p>

<p>That said, wow you can type really fast with the keyball39. I’ve really struggles to beat 100 WPM on a normal keyboard, but I can do over 120 on the keyball39… Until I have to use symbols. I really struggle to get over 30 wpm on code, it is quite frustrating to use. The only way I’ve been able to manage that is to cord thumb keys.</p>

<h2 id="the-trackball-advantage">The Trackball Advantage</h2>

<p>While my left hand and arm felt a little fatigued with the keyball, my right arm and hand feel great. The integrated trackball is a significant win compared to having to swing your arm over to a mouse. I really like that trackball quite a lot. Scrolling isn’t as good as I would like it to be, but I do think that can probably be fixed with some fine-tuning of the firmware code, which I hope to do sometime later.</p>

<p>The integrated trackball makes the Keyball39 really worth it for me. MacOS is a mouse heavy OS so the advantage is really big. So while I have been critical about many aspects in here, they are really more like nitpicks, that I think of as small ways the keyball could be made better.</p>

<h2 id="next-steps">Next Steps</h2>

<p>I’m considering a few mods to my Keyball39. In particular I really want to do a wireless mod. That would make traveling with the thing feel a lot better. But I hear that the trackball sensor is quite inefficient, so it wouldn’t be as straight forward as plopping on some pro-micro compatible boards.</p>

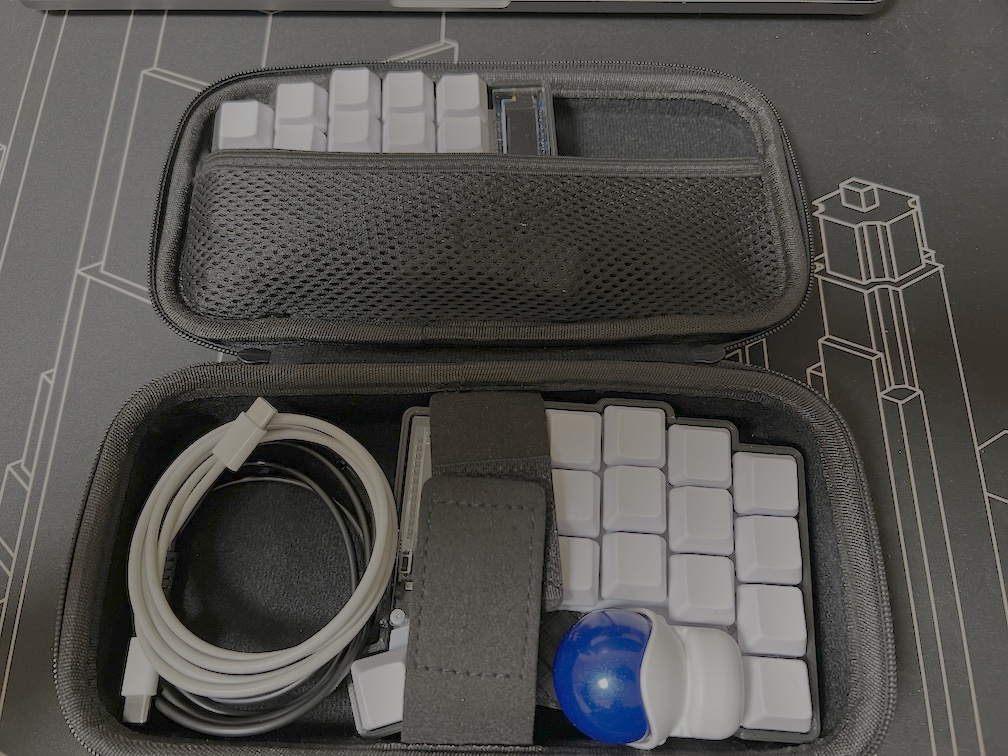
<p>I also miss the curvature of the Sculpt keyboard, and makes me think that perhaps I can design and print some 3d keycaps that give it a more natural shape. I tried printing some low profile keycaps and it worked kind of ok. The main problem is that it would make the thing less portable which I think is one of the big advantages of the Keyball39, it’s small enough to be portable, so once you get used to it, and unable to use a normal keyboard ever again, you can take it with you. It does just barely fit inside the case that came with my GPD Win 3.</p>

<p><img src="/wp-content/uploads/2025/01/IMG_2203.jpg" alt="" /></p>

<p>I might design a custom cover to make carrying it easier.</p>

<p>Next week I’m going to check out some of the custom keyboard shops in Akihabara, I plan to report back here about the experience. Definitely subscribe to the blog’s RSS feed if you want to learn about it.</p>]]></content><author><name>wmeddie</name></author><category term="Keyboards" /><summary type="html"><![CDATA[Recently, I ventured into the world of custom keyboards. Which seems to be actually a trend for engineers here in Japan. I’ve been here for a while but never really realized how many split keyboard designs actually originate from Japanese engineers. I think the Keyball keyboards are really something special, even though they are not as popular as the Corne keyboard. Since there’s not a lot of English information about the Keyball, I decided to write about it on my blog.]]></summary></entry><entry><title type="html">New Years Resolutions</title><link href="https://wm-eddie.info/2025/01/01/new-years-resolutions/" rel="alternate" type="text/html" title="New Years Resolutions" /><published>2025-01-01T15:18:00+00:00</published><updated>2025-01-01T15:18:00+00:00</updated><id>https://wm-eddie.info/2025/01/01/new-years-resolutions</id><content type="html" xml:base="https://wm-eddie.info/2025/01/01/new-years-resolutions/"><![CDATA[<p>It’s a new year, and I feel like I need to make some changes. 2024 was an incredible year for me and Xpress AI, and next year has the potential to be even better if I can make some personal changes. One of which is to get back into writing more hence why I’m restarting my blog. The main things I want to work on in 2025 are:</p>

<ol>
  <li>Get back to blogging</li>
  <li>Exercise regularly</li>
  <li>Eat less sugars</li>
  <li>Finish all the books on my bookshelf</li>
  <li>Limiting YouTube and social media to essentials</li>
  <li>Get more organized in Obsidian</li>
  <li>Become relentless at following up</li>
</ol>

<h2 id="getting-back-to-blogging">Getting back to blogging</h2>

<p>I think blogging is not only a good way to share thoughts with the world, but also a great way to internalize stuff. It’s easy to have fuzzy thoughts about a topic but not have strong opinions on it because you haven’t forced yourself to think it through. Writing things down really forces you to do that since we have to write in words and not probability distributions. It would also be a great way to share my ideas on our product and AI in general as this stuff really doesn’t fit well in tweet sized content.</p>

<p>Been thinking a lot recently about how things have changed since the days of IRC, feed readers and forums and mailing lists. On the surface, it doesn’t look like things have changed all that much with the modern alternatives of Discord, Reddit, news sites and Twitter, but I think there’s something lost in the relative shallowness of the modern formats. I’ll probably have to write a whole blog post on the specifics sometime later, but for now, I think longer form, and more personal content is what the world needs more of.</p>

<p>I also have like 10 posts that I’ve started but have never finished. It would be great to actually publish them.</p>

<h2 id="exercise">Exercise</h2>

<p>It’s definitely a staple of new year’s resolutions, I know. I do have a gym membership, but I don’t use it as regularly as I like. The main thing that I think holds me back is enough sleep. So I’ll probably have to commit to getting more sleep if I want to make progress on my exercise goals. Looking back the most productive times of 2024 were when I was getting exercise into my routine.</p>

<h2 id="eating-better">Eating better</h2>

<p>Eating less sugars is a hard one because I think in general my brain really needs some energy after working through something difficult. Exercise does help I think, but just staying away from sugar is the best way to have less sugar cravings. My weight and sugar intake are highly correlated so you’ll be able to tell how I’m doing by how I look.</p>

<h2 id="finishing-books">Finishing books</h2>

<p>The amount of tsundoku I have going on is getting to be ridiculous. Social media and Youtube are probably the biggest contributors to unread books, so staying away from them is probably the best way to get back to reading. The crazy thing is just how much I want to read the stack of books on my kindle… just never get the time.</p>

<h2 id="limiting-youtube">Limiting YouTube</h2>

<p>I’ve actually done this a couple of times. Earlier this year I installed pihole and straight up blocked YouTube, Hacker News and all the other time sink sites that I noticed I spent way too much time on. I think I had some of the most productive weeks following that, before I get sucked into it again. I’ve started blocking it again recently and think that things are better.</p>

<p>The main thing that gets me is that seeing things causes distractions. It also causes some great correlations too, but nowhere near as much as it distracts. Many people say it’s really just the recommendations that cause issues and there are extensions that block them. I’ve got both extensions and network blockers running. Having both is definitely the way to go.</p>

<h2 id="getting-organized">Getting organized</h2>

<p>Obsidian is a great tool that similar to blogging, helps me think better. But not everything should be a public blog post. Obsidian has many great tools for helping organize thoughts, but there’s also Logseq which I want to try since I use daily notes in general.</p>

<h2 id="become-relentless-at-following-up">Become relentless at following up</h2>

<p>This is probably the most impactful thing I think I can do in terms of the business. So many things this year have ended in the ball going to the other’s court and no progress made after that. I of course don’t want to become known as a pushy person so I’ll have to work on following up in the appropriate way, but I will be making sure I have an agent or tool of some sort that reminds me to just follow up after a certain time. I’d much rather have things end explicitly than just leaving “doors open” for some opportunity later.</p>

<h2 id="why-this-post">Why this post</h2>

<p>I have no intention on making this blog completely into a 90s style journal, but I did want to write this list down in public so that I can hold myself accountable to it later. Things like this are important parts of the building in public ideal, that served me very well when I was doing it earlier last year. Hopefully I can keep it up all year. Feel free to bring these up dear reader if we ever meet in person. I’d appreciate it.</p>]]></content><author><name>wmeddie</name></author><category term="General" /><category term="Personal" /><category term="Uncategorized" /><summary type="html"><![CDATA[It’s a new year, and I feel like I need to make some changes. 2024 was an incredible year for me and Xpress AI, and next year has the potential to be even better if I can make some personal changes. One of which is to get back into writing more hence why I’m restarting my blog. The main things I want to work on in 2025 are:]]></summary></entry><entry><title type="html">Using your ISP’s built-in VPN in Japan</title><link href="https://wm-eddie.info/2020/10/01/using-your-isps-built-in-vpn-in-japan/" rel="alternate" type="text/html" title="Using your ISP’s built-in VPN in Japan" /><published>2020-10-01T14:14:07+00:00</published><updated>2020-10-01T14:14:07+00:00</updated><id>https://wm-eddie.info/2020/10/01/using-your-isps-built-in-vpn-in-japan</id><content type="html" xml:base="https://wm-eddie.info/2020/10/01/using-your-isps-built-in-vpn-in-japan/"><![CDATA[<p>It’s a little known fact that the routers in Japanese ISPs are incredibly full featured when compared to the gateways you get abroad. One feature that is standard in most of them is VPN. In this post I’ll show you how I set-up my home network that allows me to access my GPU desktop from anywhere.</p>

<p>The first step is to look at the bottom of your router to find the default username and password. Then log in to the router which is typically the .1 address in your subnet. In my home it’s 192.168.9.1</p>

<p><img src="/wp-content/uploads/2020/10/screen-shot-2020-10-01-at-22.22.11.png" alt="" /></p>

<p>NTT’s Hikari Router home screen</p>

<p>Expand the 詳細設定 (Advanced Options) menu on the left to show the VPN server settings link.</p>

<p><img src="/wp-content/uploads/2020/10/screen-shot-2020-10-01-at-22.32.41.png" alt="" /></p>

<p>VPN Settings page</p>

<p>Check the 有効 checkbox to enable your VPN and take a note of the pre-shared key by clicking the 表示 button. Next make a VPN account by clicking one of the edit (編集) account slots and giving it a username and a (very strong) password.</p>

<p>To connect to the VPN on Mac open up the Network settings in the Setting app and click the add button to create a new network. Select VPN and choose the L2TP over IPSec type and give it a name.</p>

<p><img src="/wp-content/uploads/2020/10/screen-shot-2020-10-01-at-22.39.20.png" alt="" /></p>

<p>Mac OS Network Settings</p>

<p>The Server Address is your public IP address which you can get by Googling for “Whats my IP address”</p>

<p><img src="/wp-content/uploads/2020/10/screen-shot-2020-10-01-at-22.40.49.png" alt="" /></p>

<p>Authentication Settings</p>

<p>Click the Authentication Settings to enter your password and Shared Secret, click OK then Apply and you’ve finished the set-up. To test it you have to go outside your LAN but if everything is correct it’s as simple as clicking Connect.</p>

<p>Next would be to connect to your GPU machine. If you have a Linux machine you should be able to simply SSH into it using its local IP address. I use Windows for my desktop machine so I use Remote Desktop. You only have to enable it in the Remote Desktop Settings under System in the Settings Window like so:</p>

<p><img src="/wp-content/uploads/2020/10/screen-shot-2020-10-01-at-23.11.06.png" alt="" /></p>

<p>If you use Jupiter (which I don’t) you can start it up and log into it via your browser as long as you’ve set the listen address to 0.0.0.0 so that it accepts remote connections.</p>]]></content><author><name>wmeddie</name></author><category term="Apple" /><category term="Japan" /><category term="Server" /><summary type="html"><![CDATA[It’s a little known fact that the routers in Japanese ISPs are incredibly full featured when compared to the gateways you get abroad. One feature that is standard in most of them is VPN. In this post I’ll show you how I set-up my home network that allows me to access my GPU desktop from anywhere.]]></summary></entry><entry><title type="html">Hello ND4J</title><link href="https://wm-eddie.info/2017/01/31/hello-nd4j/" rel="alternate" type="text/html" title="Hello ND4J" /><published>2017-01-31T23:55:34+00:00</published><updated>2017-01-31T23:55:34+00:00</updated><id>https://wm-eddie.info/2017/01/31/hello-nd4j</id><content type="html" xml:base="https://wm-eddie.info/2017/01/31/hello-nd4j/"><![CDATA[<p>I haven’t blogged in over 4 years so I’ve decided to kick-things off again by doing a series on <a href="https://deeplearning4j.org">DeepLearning4J</a> which I’m using more and more of recently. DL4J is great because there’s no need to translate the models to something else for production. You deploy them to production by just using them inside a Tomcat web app or inside Camel pipeline right along side what you are deploying today. It’s also very ops friendly, since they can monitor the apps with JMX like they are<br />
used to.</p>

<p>Neural networks are a different kind of beast than the other machine learning algorithms. If you’ve ever played around with them, chances are that they almost always failed compared to other algorithms. There’s a lot of technique that goes into training a neural network effectively. Luckily Deep Learning frameworks have been giving us access to these techniques by name. When you know what the name of the thing you are looking for it’s much easier than doing the matrix math by hand but it’s daunting to newcomers. The basics of the matrix math isn’t too bad however, and it’s worth being familiar with it.</p>

<p>Let’s start this series in the spirit of <a href="https://www.oreilly.com/learning/hello-tensorflow">hello-tensorflow</a> (and also borrowing heavily from <a href="http://iamtrask.github.io/2015/07/12/basic-python-network/">this great tutorial</a>). I’m going to make a single neuron and try and train it to output 1 when I input 0 and output 0 when I input 1. Only instead of numpy or tensorflow, I’m going to use ND4J (the matrix library that DL4J is built on top of) so that I can use Scala.</p>

<p>Deep Learning is almost synonymous with GPUs but since we have only a single neuron it’ll run best on a CPU. First you need to create a build.sbt file and put it in an empty directory. It should look something like the following:</p>

<div class="language-scala highlighter-rouge"><div class="highlight"><pre class="highlight"><code><span class="n">name</span> <span class="o">:=</span> <span class="s">"hello-nd4j"</span>

<span class="n">version</span> <span class="o">:=</span> <span class="s">"1.0"</span>

<span class="n">scalaVersion</span> <span class="o">:=</span> <span class="s">"2.11.8"</span>

<span class="n">libraryDependencies</span> <span class="o">++=</span> <span class="nc">Seq</span><span class="o">(</span>
  <span class="s">"org.nd4j"</span> <span class="o">%</span> <span class="s">"nd4j-native-platform"</span> <span class="o">%</span> <span class="s">"0.7.2"</span><span class="o">,</span>
<span class="o">)</span>
</code></pre></div></div>

<p>Next create a main class. You can just put a scala file in the same folder as <code class="language-plaintext highlighter-rouge">build.sbt</code>:</p>

<div class="language-scala highlighter-rouge"><div class="highlight"><pre class="highlight"><code><span class="k">object</span> <span class="nc">HelloND4J</span> <span class="k">extends</span> <span class="nc">App</span> <span class="o">{</span>
  <span class="nf">println</span><span class="o">(</span><span class="s">"hello world"</span><span class="o">)</span>
<span class="o">}</span>
</code></pre></div></div>

<p>Now run <code class="language-plaintext highlighter-rouge">sbt run</code> and make sure it runs.</p>

<p>Next add some imports:</p>

<div class="language-scala highlighter-rouge"><div class="highlight"><pre class="highlight"><code><span class="k">import</span> <span class="nn">org.nd4j.linalg.api.ndarray.INDArray</span>
<span class="k">import</span> <span class="nn">org.nd4j.linalg.factor.Nd4j._</span>
<span class="k">import</span> <span class="nn">org.nd4j.linalg.ops.transforms._</span>
</code></pre></div></div>

<p>Now you should be able to do the same matrix operations that you can with Octave/Matlab and Numpy! Time to make some artificial neurons. First, lets create the input data and the outputs we want to learn. (Note: I’m embedding the bias into the input arrays as a constant 1.0 in the last position.)</p>

<div class="language-scala highlighter-rouge"><div class="highlight"><pre class="highlight"><code><span class="k">val</span> <span class="nv">input1</span> <span class="k">=</span> <span class="nf">create</span><span class="o">(</span><span class="nc">Array</span><span class="o">(</span><span class="mf">0.0</span><span class="o">,</span> <span class="mf">1.0</span><span class="o">))</span>
<span class="k">val</span> <span class="nv">input2</span> <span class="k">=</span> <span class="nf">create</span><span class="o">(</span><span class="nc">Array</span><span class="o">(</span><span class="mf">1.0</span><span class="o">,</span> <span class="mf">1.0</span><span class="o">))</span>
<span class="k">val</span> <span class="nv">inputs</span> <span class="k">=</span> <span class="nc">Array</span><span class="o">(</span><span class="n">input1</span><span class="o">,</span> <span class="n">input2</span><span class="o">)</span>

<span class="k">val</span> <span class="nv">label1</span> <span class="k">=</span> <span class="nf">create</span><span class="o">(</span><span class="nc">Array</span><span class="o">(</span><span class="mf">1.0</span><span class="o">))</span>
<span class="k">val</span> <span class="nv">label2</span> <span class="k">=</span> <span class="nf">create</span><span class="o">(</span><span class="nc">Array</span><span class="o">(</span><span class="mf">0.0</span><span class="o">))</span>
<span class="k">val</span> <span class="nv">labels</span> <span class="k">=</span> <span class="nc">Array</span><span class="o">(</span><span class="n">label1</span><span class="o">,</span> <span class="n">label2</span><span class="o">)</span>
</code></pre></div></div>

<p>Again, in this trivial example, we are trying to learn the NOT function using only multiply and add instead of boolean instructions or if statements. Let’s make the computer figure out what values it needs to make it work.</p>

<p>A neuron is usually defined as some a function that takes an input, multiplies it by a set of weights adds a bias and outputs the value of applying the result through some sort of activation function. Lets define the weights and biases:</p>

<div class="language-scala highlighter-rouge"><div class="highlight"><pre class="highlight"><code><span class="k">var</span> <span class="n">W</span> <span class="k">=</span> <span class="nf">create</span><span class="o">(</span><span class="nc">Array</span><span class="o">(</span><span class="mf">0.8</span><span class="o">,</span> <span class="mf">0.5</span><span class="o">))</span>
</code></pre></div></div>

<p>Since there is only one input, we only need a single weight and a single bias. I’ve initialized them to something random.</p>

<p>Next lets define a function that does the computation I mentioned above:</p>

<div class="language-scala highlighter-rouge"><div class="highlight"><pre class="highlight"><code><span class="k">def</span> <span class="nf">forward</span><span class="o">(</span><span class="n">input</span><span class="k">:</span> <span class="kt">INDArray</span><span class="o">,</span> <span class="n">w</span><span class="k">:</span> <span class="kt">INDArray</span><span class="o">)</span> <span class="k">=</span>
  <span class="nf">sigmoid</span><span class="o">(</span><span class="n">input</span> <span class="n">mmul</span> <span class="nv">w</span><span class="o">.</span><span class="py">transpose</span><span class="o">())</span>
</code></pre></div></div>

<p>I’m using sigmoid as the activation function here but it could be something else. I encourage you to give it a try. You can now use this to make predictions like so:</p>

<div class="language-scala highlighter-rouge"><div class="highlight"><pre class="highlight"><code><span class="k">val</span> <span class="nv">prediction1</span> <span class="k">=</span> <span class="nf">forward</span><span class="o">(</span><span class="n">input1</span><span class="o">,</span> <span class="n">W</span><span class="o">)</span> <span class="c1">// 0.62</span>
<span class="k">val</span> <span class="nv">prediction2</span> <span class="k">=</span> <span class="nf">forward</span><span class="o">(</span><span class="n">input2</span><span class="o">,</span> <span class="n">W</span><span class="o">)</span> <span class="c1">// 0.79</span>
</code></pre></div></div>

<p>It gives us 0.62 when we input a 0, which is closer to 1 than 0 but 0.79 when we input a 1, which is not what we want. To get the computer to figure out what it needs to change we need to measure how wrong it is. There are many<br />
different ways to do this but for this example I’m going to use simplest; the difference between the right answer and the prediction:</p>

<div class="language-scala highlighter-rouge"><div class="highlight"><pre class="highlight"><code><span class="k">def</span> <span class="nf">loss</span><span class="o">(</span><span class="n">prediction</span><span class="k">:</span> <span class="kt">INDArray</span><span class="o">,</span> <span class="n">label</span><span class="k">:</span> <span class="kt">INDArray</span><span class="o">)</span> <span class="k">=</span>
  <span class="n">label</span> <span class="n">sub</span> <span class="n">prediction</span>
</code></pre></div></div>

<p>Now we need a way to use the information about how wrong it is to find out what direction we need to change W to get a more correct answer. Just like you can use derivatives in physics to get the acceleration of a ball from a start and an end point, you can use the derivative of our forward function to get the acceleration between the right answer and our prediction. Tensorflow can figure out the derivatives for you, but since we are doing things manually we’ll just define it in a function which for sigmoid it’s simply x * (1 - x):</p>

<div class="language-scala highlighter-rouge"><div class="highlight"><pre class="highlight"><code><span class="k">def</span> <span class="nf">backward</span><span class="o">(</span><span class="n">out</span><span class="k">:</span> <span class="kt">INDArray</span><span class="o">)</span> <span class="k">=</span>
  <span class="n">out</span> <span class="nf">mul</span> <span class="o">(</span><span class="n">out</span> <span class="nf">add</span> <span class="o">(-</span><span class="mi">1</span><span class="o">))</span>
</code></pre></div></div>

<p>Calling backward will give you a delta for W that you can multiply by the right answer to get a better W. This delta is only for a single sample. The W for the current input might not be the right W for the other inputs. For that reason, you usually multiply the delta by a small learning rate, so that you inch closer to the right answer for all the inputs.</p>

<p>Now you can put everything together to make a training routine by wrapping it in a for loop like so:</p>

<div class="language-scala highlighter-rouge"><div class="highlight"><pre class="highlight"><code><span class="k">val</span> <span class="nv">learningRate</span> <span class="k">=</span> <span class="mf">0.1</span>
<span class="nf">for</span> <span class="o">(</span><span class="n">i</span> <span class="k">&lt;-</span> <span class="mi">0</span> <span class="n">until</span> <span class="mi">10000</span><span class="o">)</span> <span class="o">{</span>
  <span class="k">val</span> <span class="nv">pred</span> <span class="k">=</span> <span class="nf">forward</span><span class="o">(</span><span class="nf">inputs</span><span class="o">(</span><span class="n">i</span> <span class="o">%</span> <span class="mi">2</span><span class="o">),</span> <span class="n">W</span><span class="o">)</span>
  <span class="k">val</span> <span class="nv">error</span> <span class="k">=</span> <span class="nf">loss</span><span class="o">(</span><span class="n">pred</span><span class="o">,</span> <span class="nf">labels</span><span class="o">(</span><span class="n">i</span> <span class="o">%</span> <span class="mi">2</span><span class="o">))</span>
  <span class="k">val</span> <span class="nv">deltaW</span> <span class="k">=</span> <span class="nf">backward</span><span class="o">(</span><span class="n">pred</span><span class="o">)</span>
  <span class="k">val</span> <span class="nv">updateW</span> <span class="k">=</span> <span class="n">error</span> <span class="n">mul</span> <span class="n">deltaW</span>

  <span class="n">W</span> <span class="k">=</span> <span class="n">W</span> <span class="nf">sub</span> <span class="o">((</span><span class="nf">inputs</span><span class="o">(</span><span class="n">i</span> <span class="o">%</span> <span class="mi">2</span><span class="o">).</span><span class="py">transpose</span><span class="o">()</span> <span class="n">mmul</span> <span class="n">updateW</span><span class="o">)</span> <span class="n">mul</span> <span class="n">learningRate</span><span class="o">)</span>
<span class="o">}</span>
</code></pre></div></div>

<p>After running through each example about 5000 times calling forward on should be really close to the answer we want:</p>

<div class="language-scala highlighter-rouge"><div class="highlight"><pre class="highlight"><code><span class="nf">println</span><span class="o">(</span><span class="n">s</span><span class="s">"0.00 =&gt; ${forward(input1, W)}"</span><span class="o">)</span> <span class="c1">// 0.00 =&gt; 0.94</span>
<span class="nf">println</span><span class="o">(</span><span class="n">s</span><span class="s">"1.00 =&gt; ${forward(input2, W)}"</span><span class="o">)</span> <span class="c1">// 1.00 =&gt; 0.05</span>
</code></pre></div></div>

<p>Now if we look at W we can see the values you need to do NOT without an if statement:</p>

<div class="language-scala highlighter-rouge"><div class="highlight"><pre class="highlight"><code><span class="nf">println</span><span class="o">(</span><span class="n">s</span><span class="s">"$W"</span><span class="o">)</span>
</code></pre></div></div>

<p>Which should show you <code class="language-plaintext highlighter-rouge">-5.67</code> and <code class="language-plaintext highlighter-rouge">2.72</code> if you’ve been following along.</p>

<p>In the next part of the series I’ll go over how to use DL4J’s higher level API to define more complex neural networks.</p>]]></content><author><name>wmeddie</name></author><category term="Machine Learning" /><category term="Open Source" /><category term="Programming" /><category term="dl4j" /><category term="ml" /><category term="tutorial" /><summary type="html"><![CDATA[I haven’t blogged in over 4 years so I’ve decided to kick-things off again by doing a series on DeepLearning4J which I’m using more and more of recently. DL4J is great because there’s no need to translate the models to something else for production. You deploy them to production by just using them inside a Tomcat web app or inside Camel pipeline right along side what you are deploying today. It’s also very ops friendly, since they can monitor the apps with JMX like they are used to.]]></summary></entry><entry><title type="html">DL4J post on Qiita</title><link href="https://wm-eddie.info/2017/01/05/dl4j-post-on-qiita/" rel="alternate" type="text/html" title="DL4J post on Qiita" /><published>2017-01-05T16:56:52+00:00</published><updated>2017-01-05T16:56:52+00:00</updated><id>https://wm-eddie.info/2017/01/05/dl4j-post-on-qiita</id><content type="html" xml:base="https://wm-eddie.info/2017/01/05/dl4j-post-on-qiita/"><![CDATA[<p>I recently made a <a href="http://qiita.com/wmeddie/items/8f036e3eadfa3e012eed">Japanese post on How to use DL4J</a> for Qiita’s <a href="http://qiita.com/advent-calendar/2016/deeplearning">Deep Learning Advent Calendar</a>. Next chance I get I’ll post it here in English.</p>

<p>TLDR is use my <a href="https://github.com/wmeddie/dl4j-scala.g8">DL4J g8 templates</a> to get started quickly. Also you can deploy your models in a request/response style using Stateless EJBs.</p>]]></content><author><name>wmeddie</name></author><category term="Uncategorized" /><summary type="html"><![CDATA[I recently made a Japanese post on How to use DL4J for Qiita’s Deep Learning Advent Calendar. Next chance I get I’ll post it here in English.]]></summary></entry><entry><title type="html">How Cappuccino handles pass-by-reference APIs in Cocoa.</title><link href="https://wm-eddie.info/2012/08/04/how-cappuccino-handles-pass-by-reference-apis-in-cocoa/" rel="alternate" type="text/html" title="How Cappuccino handles pass-by-reference APIs in Cocoa." /><published>2012-08-04T13:13:39+00:00</published><updated>2012-08-04T13:13:39+00:00</updated><id>https://wm-eddie.info/2012/08/04/how-cappuccino-handles-pass-by-reference-apis-in-cocoa</id><content type="html" xml:base="https://wm-eddie.info/2012/08/04/how-cappuccino-handles-pass-by-reference-apis-in-cocoa/"><![CDATA[<p>I’ve been using Cappuccino at work recently and I came across a corner of Objective-J that I previously didn’t know about: how to use enumerateObjectsUsingBlock.</p>

<p>One of the nice things about Objective-C is that it has blocks.  Blocks allow you to make functions that take other functions as arguments, all while preserving scope. One of the most popular block-using APIs is the NSArray method enumerateObjectsUsingBlock. It takes a block that has three arguments: the current value of the iteration, the current index and a reference to a Boolean stop variable. If you set the variable to YES the loop will stop (much like the break keyword, which only works to break out of while and for loops.)</p>

<p>This is a problem for JavaScript because it always passes by value. Since it’s very cheap to create objects in JavaScript you could just pass an object with a property you can set, but that means that you have to remember the property name to set and the caller has to remember to copy that value back out. The Cappuccino developers thought of using a function that closes over an object in the parent scope via a macro called AT_REF.</p>

<p>To use a cappuccino AT_REF you simply call it and pass in the new value you want to set. Like so:</p>

<div class="language-objectivec highlighter-rouge"><div class="highlight"><pre class="highlight"><code><span class="p">[</span><span class="n">array</span> <span class="nf">enumerateObjectsUsingBlock</span><span class="p">:</span><span class="n">function</span> <span class="p">(</span><span class="n">item</span><span class="p">,</span> <span class="n">i</span><span class="p">,</span> <span class="n">stop</span><span class="p">)</span> <span class="p">{</span>
    <span class="n">stop</span><span class="p">(</span><span class="nb">YES</span><span class="p">);</span>
<span class="p">}];</span>
</code></pre></div></div>

<p>In the implementation of enumerateObjectsUsingBlock you’ll see something like the following:</p>

<div class="language-javascript highlighter-rouge"><div class="highlight"><pre class="highlight"><code><span class="kd">var</span> <span class="nx">stop</span> <span class="o">=</span> <span class="nx">NO</span><span class="p">;</span>
<span class="k">for</span> <span class="p">(</span><span class="kd">var</span> <span class="nx">i</span> <span class="o">=</span> <span class="mi">0</span><span class="p">;</span> <span class="nx">i</span> <span class="o">&lt;</span> <span class="nx">length</span><span class="p">;</span> <span class="nx">i</span><span class="o">++</span><span class="p">)</span> <span class="p">{</span>
    <span class="nx">block</span><span class="p">(</span><span class="nx">arr</span><span class="p">[</span><span class="nx">i</span><span class="p">],</span> <span class="nx">i</span><span class="p">,</span> <span class="nx">BY_REF</span><span class="p">(</span><span class="nx">stop</span><span class="p">));</span>
    <span class="k">if</span> <span class="p">(</span><span class="nx">stop</span><span class="p">)</span>
        <span class="k">break</span><span class="p">;</span>
<span class="p">}</span>
</code></pre></div></div>

<p>The AT_REF macro expands to something like:</p>

<div class="language-javascript highlighter-rouge"><div class="highlight"><pre class="highlight"><code><span class="p">(</span><span class="kd">function</span><span class="p">(</span><span class="nx">val</span><span class="p">)</span> <span class="p">{</span>
    <span class="k">if</span> <span class="p">(</span><span class="nx">arguments</span><span class="p">.</span><span class="nx">length</span><span class="p">)</span>
        <span class="k">return</span> <span class="p">(</span><span class="nx">stop</span> <span class="o">=</span> <span class="nx">val</span><span class="p">);</span>
    <span class="k">return</span> <span class="nx">val</span><span class="p">;</span>
<span class="p">})</span>
</code></pre></div></div>

<p>That way you can both set the value by calling it with an argument and get the value by calling it with no arguments.</p>

<p>It’s brilliant if you ask me. But then again, pretty obvious when you think about it.</p>

<p>In the future the devs would like to integrate this into the language by using @ref() and @deref(), (hence the name of the macro).</p>

<p>To define methods that use AT_REF in your own code you can simply @import &lt;Foundation/Ref.h&gt;.  Clients of your API just need to know to call the argument to set and get it’s value.</p>]]></content><author><name>wmeddie</name></author><category term="Apple" /><category term="Open Source" /><category term="Cappuccino" /><category term="JavaScript" /><summary type="html"><![CDATA[I’ve been using Cappuccino at work recently and I came across a corner of Objective-J that I previously didn’t know about: how to use enumerateObjectsUsingBlock.]]></summary></entry><entry><title type="html">What worries me about Scala</title><link href="https://wm-eddie.info/2012/05/04/what-worries-me-about-scala/" rel="alternate" type="text/html" title="What worries me about Scala" /><published>2012-05-04T00:10:50+00:00</published><updated>2012-05-04T00:10:50+00:00</updated><id>https://wm-eddie.info/2012/05/04/what-worries-me-about-scala</id><content type="html" xml:base="https://wm-eddie.info/2012/05/04/what-worries-me-about-scala/"><![CDATA[<p>I’ve recently been rediscovering podcasts.  I’m particularly fond of the NodeUp podcast, but I also listen to podcasts about Rails, Clojure, and Scala.  The Scala podcast is by far the most academic; taking a shot every time they say the word “type” makes for a pretty nice drinking game.</p>

<p>I must admit I like academic and theoretical discussion as much as the next guy, but I worry about how little attention is paid to practical matters.  NodeUp on the other-hand is almost completely about practical things: libraries, frameworks, scaling, deployment, etc.  I’ve found them all to be pretty informative.  The Rails podcast is also fairly practical, but they do tend to cover object-oriented design patterns from time to time.  I admit that JavaScript and Ruby aren’t exactly paradigm-shifting languages, but still, programming is about more than just the mathematics.</p>

<p>For example, the Scala world has two great web frameworks: Lift and Play.  It would be nice to hear how they <strong>feel</strong>, not just about how type safe they are.  Granted type safety is one of the main reasons I’m interested in Scala over node/ruby, but programming is about tradeoffs.  Things like programmer productivity anecdotes are really worth something to new-comers and are a great fit for a discussion-centric medium like a podcast.</p>

<p>If Scala is going to become a mainstream language, there needs to be more discussion on these touchy-feely and practical subjects. If you know any, please let me know in the comments.  Podcasts about Scala are really hard to find.</p>]]></content><author><name>wmeddie</name></author><category term="Open Source" /><category term="Programming" /><category term="jvm" /><category term="programming" /><category term="scala" /><category term="theory" /><summary type="html"><![CDATA[I’ve recently been rediscovering podcasts. I’m particularly fond of the NodeUp podcast, but I also listen to podcasts about Rails, Clojure, and Scala. The Scala podcast is by far the most academic; taking a shot every time they say the word “type” makes for a pretty nice drinking game.]]></summary></entry><entry><title type="html">Apple’s JIS Keyboard layout and the ADM3A</title><link href="https://wm-eddie.info/2012/03/25/apples-jis-keyboard-layout-and-the-adm3a/" rel="alternate" type="text/html" title="Apple’s JIS Keyboard layout and the ADM3A" /><published>2012-03-25T21:12:58+00:00</published><updated>2012-03-25T21:12:58+00:00</updated><id>https://wm-eddie.info/2012/03/25/apples-jis-keyboard-layout-and-the-adm3a</id><content type="html" xml:base="https://wm-eddie.info/2012/03/25/apples-jis-keyboard-layout-and-the-adm3a/"><![CDATA[<p>A few weeks ago a blog post on catonmat.com showed pictures of the <a href="http://www.catonmat.net/blog/why-vim-uses-hjkl-as-arrow-keys/">old terminal that Bill Joy used when he created VI</a>.  Terminals back then didn’t have arrow keys so if you wanted to move the cursor around you held down some kind of modifier and hit the H, J, K or L keys.  And they were labeled as such.  This news didn’t really interest me because I’ve read that somewhere before but when someone on my twitter stream posted a picture of the keyboard I noticed how much it resembles my Mac’s keyboard layout.</p>

<p>Since I live in Japan I use a Mac with a Japanese keyboard layout. The standard Japanese keyboard layout is a little hard to get used to at first because while it is a QWERTY keyboard some characters are in different places.  The placing of the double quote character and the left and right parenthesis eventually grew on me, but I always had a nagging feeling that the Japanese keyboard arbitrarily changed the locations of these very important for programming keys for no good reason.</p>

<p>When I saw the keyboard layout of the ADM3A I realized that it was in fact kind of the opposite.  The US keyboard layout has changed significantly since the 70s, but the Japanese keyboard didn’t.  Apple even keeps the position of the CTRL key where it should be (To the left of A).</p>

<p><a href="/wp-content/uploads/2012/03/f9f5e-800px-kb_terminal_adm3a.svg_.png"><img src="/wp-content/uploads/2012/03/f9f5e-800px-kb_terminal_adm3a.svg_-300x97.png" alt="" title="Terminal_ADM3A" /></a></p>

<p>The legendary ADM3A keyboard layout. (credit. Wikipedia)</p>

<p><a href="/wp-content/uploads/2012/03/682d6-applejiskeyboard.png"><img src="/wp-content/uploads/2012/03/682d6-applejiskeyboard-300x129.png" alt="" title="Apple JIS Keyboard" /></a></p>

<p>The Apple Japanese keyboard. The Standard Japanese Keyboard layout has the exact same number row keys as the ADM3A.</p>

<p>I think this might be one of the reasons that I’ve grown to like the Japanese keyboard layout.</p>]]></content><author><name>wmeddie</name></author><category term="Apple" /><category term="Japan" /><summary type="html"><![CDATA[A few weeks ago a blog post on catonmat.com showed pictures of the old terminal that Bill Joy used when he created VI. Terminals back then didn’t have arrow keys so if you wanted to move the cursor around you held down some kind of modifier and hit the H, J, K or L keys. And they were labeled as such. This news didn’t really interest me because I’ve read that somewhere before but when someone on my twitter stream posted a picture of the keyboard I noticed how much it resembles my Mac’s keyboard layout.]]></summary></entry><entry><title type="html">Password Maker</title><link href="https://wm-eddie.info/2011/07/17/password-maker/" rel="alternate" type="text/html" title="Password Maker" /><published>2011-07-17T16:20:28+00:00</published><updated>2011-07-17T16:20:28+00:00</updated><id>https://wm-eddie.info/2011/07/17/password-maker</id><content type="html" xml:base="https://wm-eddie.info/2011/07/17/password-maker/"><![CDATA[<p>With all the recent database compromises going on lately, I’ve decided to step my passwords up a notch.</p>

<p>My old “password scheme” was pretty simple, I had 4 different levels of passwords so that if a lower one got compromised the more sensitive passwords would still be safe.  The flaw in this scheme is that if one of your sensitive passwords are exposed then all your other sensitive sites are.  I used to think that my banking websites would have pretty hardened systems, but that’s not necessarily the case.</p>

<p>The <strong>only</strong> safe way to handle passwords online is to have a unique password for every site you use.  A lot of people complain that memorizing passwords is hard, but I find it actually pretty easy (I memorized thousands of Kanji after all). The real hard part is remembering which password you used for what site.  When you have 4 passwords, you can just iterate through them without getting locked out but it doesn’t work when you have tens or hundreds of passwords to try.</p>

<p>Luckily there are a few companies with products to solve this problem. I looked at services like <a href="http://lastpass.com/">LastPass</a> and <a href="http://agilebits.com/products/1Password">1Password</a>. 1Password was way to expensive and LastPass was hard to use, ugly, and for some inexplicible reason stored your passwords on a server.  No matter what encryption they use today, it’ll be completely inadequate in 5 or 10 years.</p>

<p>Enter <a href="http://passwordmaker.org/">PasswordMaker</a>, it’s an open-source extension for Firefox that generates passwords for websites based on the URL of the site you are visiting hashed with a master password.  This is probably the only scalable solution to the password problem.  It also does this without storing your password anywhere which makes it the most secure solution I’ve found yet. Plus the algorithm for generating passwords is simple so if I’m ever in some kind of a pinch, I can regenerate my passwords by hand (with the help of the md5 utility).</p>

<p>The main problems with PasswordMaker is that it doesn’t work very well on mobile phones.  There’s an Android port, but it’s about as bare as can get.  It could use some UX love. For example, It could take advantage of Android’s Share intent to get rid of the whole URL input dance that you have to do now.</p>

<p>Although this setup is working for me without too much pain, I still think that the whole username/password system is way too complicated.  The fact that I need a program to manage them definitely makes it a smell.  I loved <a href="http://openid.net/">OpenID</a>, but apparently it’s also too complicated for users, so now I’m really rooting for Mozilla’s recently announced <a href="https://browserid.org/">BrowserID</a>.  As more and more software and services move to the cloud, BrowserID, or something like it, is pretty much going to be required to keep login-creep at bay. It should help reduce the anxiety that people like my wife have when thinking about whether or not they should sign-up for some new site.</p>]]></content><author><name>wmeddie</name></author><category term="Open Source" /><category term="Security" /><summary type="html"><![CDATA[With all the recent database compromises going on lately, I’ve decided to step my passwords up a notch.]]></summary></entry><entry><title type="html">My first Arduino</title><link href="https://wm-eddie.info/2011/02/08/my-first-arduino/" rel="alternate" type="text/html" title="My first Arduino" /><published>2011-02-08T01:07:16+00:00</published><updated>2011-02-08T01:07:16+00:00</updated><id>https://wm-eddie.info/2011/02/08/my-first-arduino</id><content type="html" xml:base="https://wm-eddie.info/2011/02/08/my-first-arduino/"><![CDATA[<p>Yesterday my wife decided to buy yet another sewing pattern book and I decided to tag along.  As a Kindle user, there’s usually very little for me to do at a bookstore.  I usually just look around the IT section of the magazine rack and thumb through the amazing Ubuntu magazine, or Nikkei Linux.  This time though, a magazine called “<a href="http://otonanokagaku.net/english/" title="Otona no Kagaku">Otona no Kagaku</a>” caught my eye.</p>

<p><a href="/wp-content/uploads/2011/02/fa1ed-img_20110206_115515-e1297094439618.jpg"><img src="/wp-content/uploads/2011/02/fa1ed-img_20110206_115515-e1297094439618-225x300.jpg" alt="" title="IMG_20110206_115515" /></a></p>

<p>“Otona no Kagaku” is magazine that comes with some kind of sience related device inside that you can put together.  There were all kinds of projects from synthesizers to airplanes, all sorts of fun.  Kids today are so lucky, I wish I had a magazine like that when I was a kid.</p>

<p>Anyway I’m too old for most of them to be interesting but <a href="http://otonanokagaku.net/english/magazine/vol27/index.html" title="one of them came with an Arduino board">one of them came with an Arduino board</a> (branded as “Japanino”).  Since the magazine cost about as much as a new pre-assembled Arduino + shipping I decided to buy it.  The magazine is filled with a bunch of projects other than the one on the cover and explains how to go about doing them.  It’s amazing all the cool things people are doing with the Arduino. One guy uses an array of Arduinos to electricute himself in the face it seems.  To each his own I guess.</p>

<p>The Persistence of Vision project was really simple to set up.  Just a few screws and the website had all the software you needed already.  Here’s what the finished product looks like.</p>

<p><a href="/wp-content/uploads/2011/02/ff052-img_20110206_115402.jpg"><img src="/wp-content/uploads/2011/02/ff052-img_20110206_115402-300x225.jpg" alt="" title="IMG_20110206_115402" /></a><br />
The IDE is really simple.  It’s amazing how low the bar is to get code onto these things.  Way back when (circa 2005) I still had to build a cross-compiler environment.  The language is like a C version of Processing, which is really intuitive and gets rid of having to write a boiler-plate event-loop in the main function.</p>

<p>Now I’m thinking about what to do next.  At work I’ve been experimenting with a presence system based on bluetooth which automatically locks the computer when I’m out of range.  Unfortunately Bluetooth has a pretty long range.  I wonder if there’s any NFC shields for the Arduino.  It’d be pretty cool if you could use your phone as a smart-card via NFC.</p>

<p><a href="/wp-content/uploads/2011/02/7e08e-img_20110206_002552.jpg"><img src="/wp-content/uploads/2011/02/7e08e-img_20110206_002552-300x225.jpg" alt="" title="IMG_20110206_002552" /></a></p>]]></content><author><name>wmeddie</name></author><category term="Japan" /><category term="Linux" /><category term="Programming" /><summary type="html"><![CDATA[Yesterday my wife decided to buy yet another sewing pattern book and I decided to tag along. As a Kindle user, there’s usually very little for me to do at a bookstore. I usually just look around the IT section of the magazine rack and thumb through the amazing Ubuntu magazine, or Nikkei Linux. This time though, a magazine called “Otona no Kagaku” caught my eye.]]></summary></entry></feed>